


![SoftPro™ Chlorine+ Carbon Whole House Water Filter to Remove PFAS, Chlorine, Chloramine & Pesticides [City Water Filters Series]](http://www.softprowatersystems.com/cdn/shop/files/SoftPro_Whole_House_Carbon_Filter_with_Spin_Down_Water_Filter.webp?v=1783547361&width=140)
![SoftPro™ Iron Filter - Iron Master AIO [Air Injected Water Filter / Katalox]](http://www.softprowatersystems.com/cdn/shop/files/SoftPro_AIO_Iron_Master_Iron_Filter_Main.webp?v=1783547787&width=140)


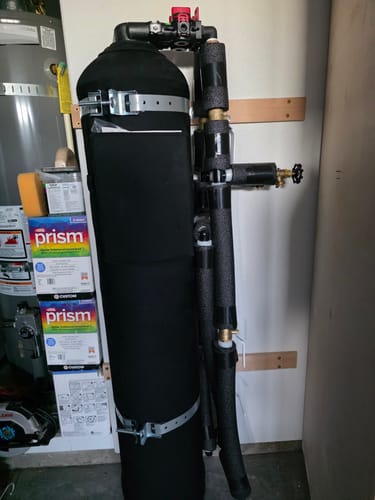
Iron Filter and Water Softener Installation: The Correct Sequence Fully Explained for DIY Homeowners

When installing an iron filter and water softener, sequence matters more than most homeowners realize. We always start with a sediment filter, follow it with the iron filter, and finish with the water softener. This order lets the iron filter oxidize ferrous iron before it ever reaches the softener's resin beads, preventing costly clogs and premature system failure. Get the sequence wrong, and you're looking at repairs that could've been avoided. Stick with us—there's a lot more you'll want to know.
Key Takeaways
- Always install the iron filter before the water softener to prevent iron from clogging the resin beads and reducing softener efficiency.
- Begin the installation sequence with a sediment filter, followed by the iron filter, then conclude with the water softener.
- The iron filter oxidizes ferrous iron into ferric iron, making it easier for the system to remove effectively.
- Program both units using actual water test results, setting regeneration cycles every three to seven days based on household usage.
- Maintain the system by replacing filters every six to twelve months and keeping the brine tank at least one-quarter full.
Why Iron Filter Must Come Before the Water Softener

When setting up a water treatment system, the order of installation matters more than most people realize. Place the iron filter first, and here's why it's non-negotiable: it oxidizes ferrous iron into ferric iron, making those particles far easier to capture before water ever reaches your softener.
Think of your water softener's resin beads as precision instruments. They're designed to remove hardness minerals—not iron. When iron sneaks through first, it binds to those beads, clogs the system, and triggers more frequent regeneration cycles, burning through salt and money.
The correct sequence—iron filter before softener—protects your resin bed, extends your system's lifespan, and delivers consistently cleaner, softer water.
Installing your iron filter before your softener protects your resin bed and extends your system's lifespan.
Get the order right, and everything downstream works better.
Tools, Fittings, and Pipe Materials for This Installation
Before we touch a single pipe, let's make sure we've got the right tools and materials on hand—because a smooth installation hinges on preparation.
Here's what you'll need:
| Category | Item | Purpose |
|---|---|---|
| Tools | Pipe cutter, wrench, screwdriver | Core installation tasks |
| Piping | ¾ PEX tubing | Flexible backwash connections |
| Fittings & Hardware | Copper/brass fittings, Teflon tape, bypass valve | Leak prevention, durability, maintenance access |
Match your fitting sizes to your existing plumbing diameter—mismatches create flow restrictions that undermine your entire system's performance. We recommend ¾ PEX for flexible sections; it handles backwash pressure beautifully. For rigid runs, copper or brass resists corrosion in high-pressure zones. Don't skip the bypass valve—it's your lifeline during future maintenance.
The Correct Installation Sequence: Iron Filter to Softener
With our tools and materials staged and ready, let's talk about something that trips up a lot of DIYers—the order in which everything goes together.
Sequence isn't arbitrary here; it's engineering logic.
First comes the sediment filter. It catches larger particles and protects everything downstream. Skip this step, and you're letting debris assault your iron filter and softener prematurely.
Second, the iron filter. It oxidizes ferrous iron, converting it into ferric iron that's far easier to remove. Without this step, dissolved iron flows directly into your softener, binding to the resin beads and crippling its efficiency.
Last, the water softener. By this point, the heavy lifting is done, and your softener can focus purely on what it does best—ion exchange.
That's how you protect your investment long-term.
How to Program Your Iron Filter and Softener Settings
Now that the hardware's in place, there are four core settings we need to dial in to make both systems perform at their peak.
First, input your exact water hardness level from your test results — don't estimate.
Second, set the current time on the control panel so regeneration cycles can be scheduled during low-usage windows, ideally around 2 AM.
Third, configure regeneration frequency between every three to seven days, adjusting based on your household's consumption and iron concentration.
Fourth, consult each manufacturer's manual for system-specific programming requirements, since configurations vary.
Finally, establish a regular water-testing schedule so we can catch shifts in water quality early and recalibrate settings before performance drops.
Precision here determines everything downstream.
Filter Replacement, Salt Levels, and Quarterly Testing Schedule
Keeping the system running at full capacity means staying on top of three ongoing responsibilities: filter maintenance, salt levels, and regular water testing.
Replace or clean sediment and iron filters every 6-12 months—neglect this, and you'll face clogging and reduced filtration efficiency. For the brine tank, keep it at least one-quarter full, replenishing salt monthly based on your household's usage. Running low quietly kills softener performance before you'll even notice.
Every quarter, test your water for hardness and iron levels. Results tell you whether your settings need adjusting—don't guess when data's available.
Finally, every 10-15 years, plan for resin bead replacement; they degrade over time and directly impact softening capability. Stay proactive, and this system rewards you with consistent, high-quality water.
Frequently Asked Questions
What Goes First, Softener or Iron Filter?
The iron filter goes first! We install it before the softener to convert ferrous iron into ferric iron, protecting the softener's resin beads from binding and ensuring your entire system performs at its best.
Do I Need an Iron Filter if I Have a Water Softener?
If your iron levels exceed 0.3 ppm, we'd strongly recommend adding an iron filter. Without it, iron can foul your softener's resin, reducing its effectiveness and shortening its lifespan considerably.
Does a Whole House Filter Go Before or After Softener?
We recommend installing your whole house filter before your softener. It captures sediment, dirt, and sand first, protecting the softener's resin beads from damage and ensuring your system runs efficiently longer.
What Are All the Steps to Installing a Water Softener?
We'll start by gathering tools, shutting off water, draining pipes, cutting the main line, attaching adapters, connecting tubes to inlet, outlet, brine tank, and drain, then restoring water supply and configuring settings.


